
Are you intimidated by the thought of migrating your WordPress website from one web host to another?
Do you fear that you may break something, lose your content, or simply end up in some kind of hellish, online no-mans-land with no idea how to proceed?
But, however tricky a website migration may seem, do you really want to stay with hosting you are not happy with? Inadequate or unsuitable web hosting can limit the success of your website.
[Tweet “Migrate your WordPress site to a new host/domain name in 11 simple steps…”]Migrating a WordPress site is not as frightening as it sounds. As with many complex tasks, breaking the process down into a step-by-step process makes a WordPress migration more manageable and easier to achieve.
The process is a little different depending on whether or not you wish to use the same domain and URL structure, or are moving to a completely new domain name or directory. We’ll explain along the way.
An example of moving to a new domain would be www.yourdomain.com >> www.your-domain.co.uk.
A move to a new directory might look like www.yourdomain.com/blog >> www.yourdomain.com/news.
If you are yet to register or find your new domain, be sure to check availability via LCNs domain name checker.
01. Back up your existing website
Glitches can occur when websites are migrated, so it is essential to make sure your data is backed up before you start.
Fortunately, there are WordPress plugins available that make light work of backing up a WordPress site. Some popular options are:
- BackUpWordPress: a free option that will back up all WordPress databases and files on your own schedule.
- BackWPUp Free: a tool that allows users to back up their WordPress site to Dropbox, Google Drive, S3 services and more.
When you are confident that you have a recent backup of your WordPress site, it’s time to start the migration.
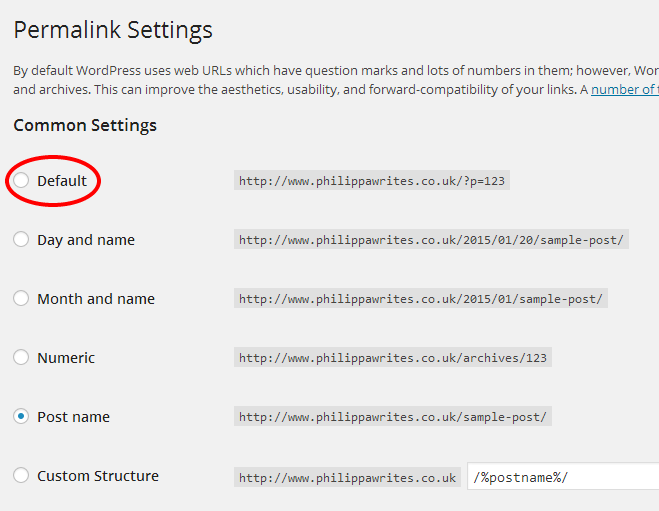
2. Disable Permalinks
The step is only necessary if you are changing your domain name or directory.
Go to ‘Settings’ and then ‘Permalinks’ in the existing WordPress interface for your website. Select ‘default’ and save the change.
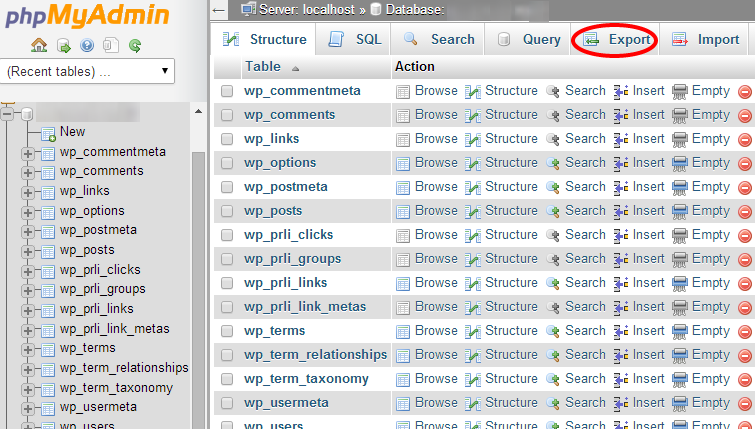
03. Save a copy of your website’s database
The next step is to save a new copy of your website’s database (you will edit this in step seven). In your existing website’s phpMyAdmin, highlight the database and click ‘Export’ and then ‘Go’.
Make a copy of this database immediately and give it a new name; you might want to incorporate the date into the new filename.
04. Install WordPress on the new host
Most web-hosting companies provide a really easy tool, such as Softaculous, that allows users to install WordPress in just a few clicks – LCN has their own one-click installer with their WordPress hosting.
Alternatively, you may prefer to install WordPress manually.
05. Download your website content to your computer
Using a file-transfer protocol (FTP) tool, download the entire contents of the wp-content folder (from your existing website host) to your computer.
There are lots of FTP software options available; FileZilla and SmartFTP are popular options.
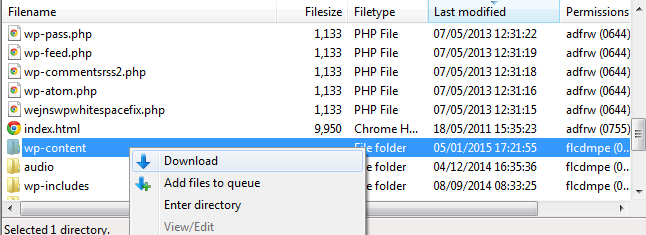 Downloading your wp-content folder with Filezilla
Another possibility, if you use cPanel, is to download all your content as a .zip file.
This is usually a quicker and less pernickety task than dealing with hundreds or thousands of individual files using FTP.
Make a note of where you store this data so that you can easily access it for the next step.
06. Upload wp-content to the new host
Input your new web host’s FTP settings into your FTP client; at LCN, these can be found in the ‘Manage Hosting’ area of your account.
Using FTP, upload the wp-content files to your new WordPress installation. Make sure your select the correct folder. For instance: a sub-directory called “blog” if you want to install at www.yourdomain.com/blog, or just upload the install right into the root directory if you wish to not install to any sub-director.
If you are using cPanel, you can simply upload the complete .zip file that you downloaded in the last step.
07. Edit your website’s database
This step is only necessary if you are changing your domain name or directory.
Now you’ll need to replace the details of your old URL with your new one in the database files. A tool like Search-Replace-DB will help you to make sure that you don’t make any changes that will cause errors with your new site.
Save the renamed database on your computer.
08. Delete the WordPress database
If you used a one-click-install tool to install WordPress, you will need to delete the database that is automatically created.
In your new host’s phpMyAdmin, click on ‘Structure’, then ‘Check all’. Select ‘Drop’ in the menu and confirm that you want to delete everything you selected.
09. Upload your most up-to-date database to the new web host.
Now upload your database. This is either the unchanged database from your old site or your newly updated database with the new domain / sub-directory amendments.
Stay in phpMyAdmin and click ‘Import’. Select the database you edited, click ‘Upload’, and confirm the action.
This may take some time for large databases; wait until you get a confirmation message telling you the upload is complete.
10. Log into your newly migrated WordPress site
Log into WordPress via your new hosting service and go back to Settings > Permalinks. Select the link-structure option you were using before the migration and save the changes.
If you have any difficulties at this stage, clear the cache in your web browser and try again.
11. Breathe out. You’ve done it.
That’s it! Your WordPress site has been migrated to your new web host.
Test it out, check that the formatting is correct, try out the internal linking structure and make sure your content is all where it is supposed to be.
Now, make yourself a nice cup of tea and congratulate yourself on a job well done.
Now you’ve migrated your WordPress site, don’t miss our 8500+ word ultimate guide to WordPress.
Your Say!
Have you ever migrated a WordPress website between hosts? How did it go? Tell us in the comments below!
Can’t tell you how thankful I am for this wonderful post written by you. For a newbie like me, it made my task of shifting my site super easy. One of the biggest challenge of internet is find out whic information is correct and which isn’t?
Thank you Phillipa for this post.
Hi Phillipa,
Many thanks for the great and very useful post!
Whilst I’ve used this method many times, for the past few months I’ve used a free plugin called Duplicator https://wordpress.org/plugins/duplicator/. As I build and transfer many WP sites, this plugin has saved me countless hours and it’s a breeze to use!
There are many plugins claiming ‘backup solutions’ but this is certainly one to consider 🙂
Andy
Thanks Andy, we’ll have a look at that one 🙂
Have a look at Backup Buddy plugin. It’s a commercial product which cost about £ 60.00 for 2 site licenses.
It’s very easy to use and always has top reviews. Well worth a look.