How to set up your email account in Mozilla Thunderbird
This guide will explain how to set up your email address in Mozilla Thunderbird for customers using LCN web hosting, WordPress hosting, Email hosting or LiteMail with an Authenticated SMTP.
Before you get started, you’ll need to have your email address and password handy. If you can’t remember these details, you can check and reset them from your LCN account.
You will also need to ensure you have Authenticated SMTP enabled. You can find out how to do this here.
Let’s get started…
- Open Mozilla Thunderbird.
- Click Create a new account from the main screen.
- You should now see a new menu pop up entitled Mail Account Setup. You will be prompted to enter a Display Name, an Email Address and a Password. These details will be for the domain email address you intend to use with Mozilla Thunderbird. Click Continue when you have finished entering your details.
- As Thunderbird uses an auto-configure system for your email, your domain email settings should be pulled directly from the LCN.com server and auto-populate the remaining email server settings. If you entered all of your domain email details correctly, you should see a screen similar to this:
- Simply click Done and your mailbox will finish setting up.
If you see a message which states Thunderbird failed to find the settings for your email account, please follow the next step below.
- You now need to Manually set up the server details in order to create a connection from Thunderbird to our mail servers. Please use the following:
- Select IMAP for the incoming server type.
- Enter mail.lcn.com for the Incoming server hostname.
- Choose Port 143 and select STARTTLS or None for the SSL type.
- Select Normal password for the Authentication.
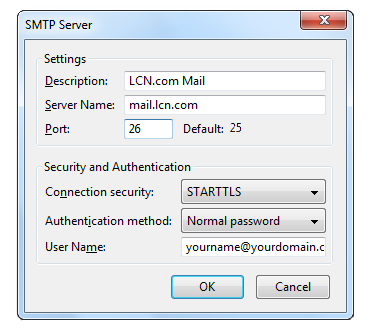
- SMTP should be selected for the outgoing server type.
- Enter mail.lcn.com in to the Server hostname for the outgoing mail.
- Choose Port 25 and select None for the SSL type.
- Select Normal password for the Authentication.
Finally, enter your full e-mail address in the Username text box.
- Select Re-Test to check the settings. If they are correct you will get a message stating The following settings were found by probing the given server.
- Click Done.
Please Note: You may get a message warning you of the changed settings. Click I understand the risks. Then Done.
- Your account should now be set-up within Thunderbird and you will be taken back to the main screen. The new mailbox will be on the left hand side.
Your email address should now be set up and ready to go!
Please Note: Depending on your internet service provider, the default port of 25 should allow you to send email. If you find that you are having problems, the first step would be to change the port from 25 to 26 or 587. To do this choose the View settings for this account option and then Outgoing Server (SMTP). Selecting edit will allow you to edit the server details.