How to edit your hosts file
First up, what is a hosts file? Well, put simply it’s your computer’s address book. This is used to map hostnames to IP addresses. Think of it a bit like the old telephone directories you’d use to search a name to get the phone number.
Whenever you put a website address in your web browser, your computer will check its hosts file for the IP to resolve the address to, before attempting to resolve the domain using the DNS servers on your network.
So, why would you change it? Well, one of the main reasons for doing this, is to test whether a website works after you’ve moved it to a new hosting provider, before changing the DNS to point to them. Changing your computer’s hosts file tricks it into looking at the new server, rather than the old one and any changes in it happen instantly, compared to the 72 hours you may have to wait if you change the DNS on the domain.
Ok, how do I do it?
Editing the hosts file on a Windows PC
- Click Start > All Programs > Accessories
- Right click Notepad and select Run as administrator
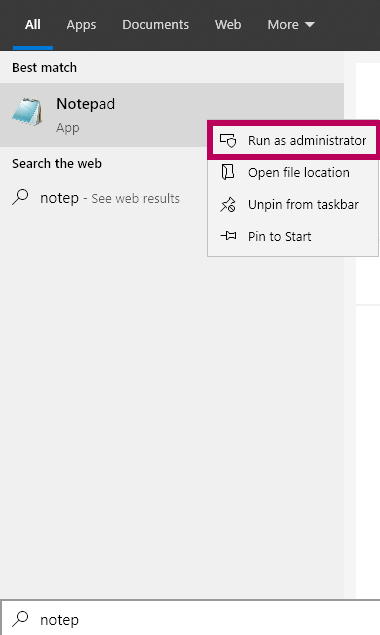
- Click Yes/Continue on the user access prompt
- Click File > Open
- Change the file filter drop down box from Text Documents (*.txt)” to “All Files (*.*)
- Go to C:\Windows\System32\Drivers\etc
- Select hosts and click Open
- Add the following 2 lines:
123.123.123.123 mydomain.com
123.123.123.123 www.mydomain.com
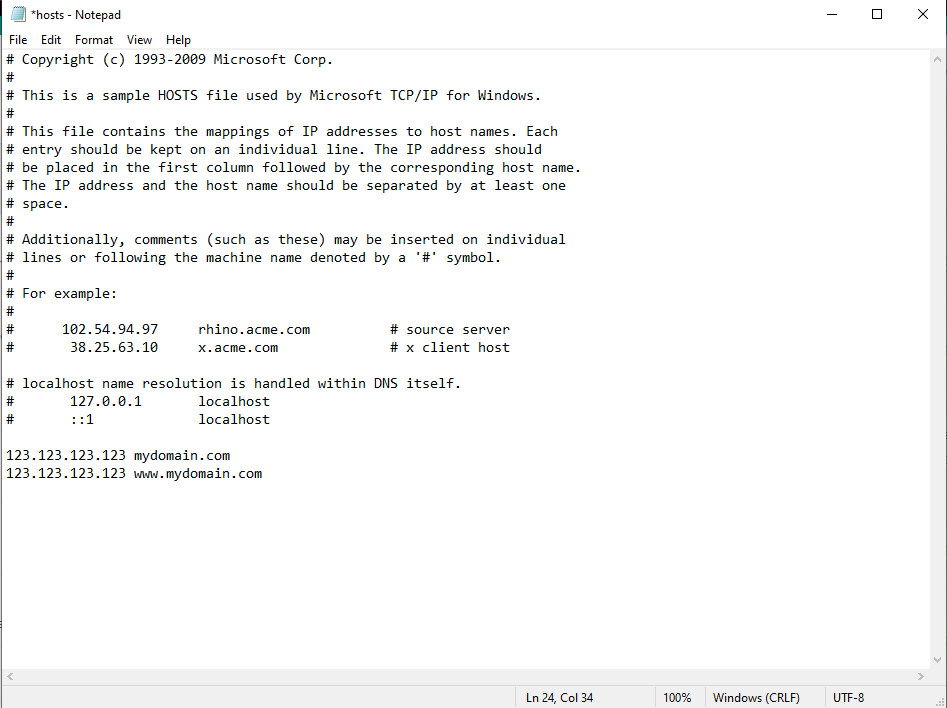
- Replace ‘mydomain.com’ with your domain name
- Replace ‘123.123.123.123’ with the IP address of your LCN hosting. If you are not sure of the correct IP please contact us.
- Close Notepad. Click Save when prompted
- Open your web browser and browser to the domain name above and it’ll resolve to the IP you’ve entered.
That’s it! You’ve successfully edited your hosts file.
Undoing the change
When you have completed your checks you will want to undo the change you have made to avoid encountering problems in the future.
To undo the change, you will simply need to repeat the above steps from 1 to 7. Rather than add lines you now remove the lines you added before. Then close and resave the file.
That’s it your have successfully reverted the change to your hosts file.
Editing on a Mac
- Open Terminal (Click Spotlight, or press Command+Space. Now type terminal.)
- Copy and paste the following line into Terminal: sudo nano /etc/hosts
- Press Enter
- You will now be prompted for your computer’s password. Enter it and press Enter
- The nano application will open with the hosts file loaded
- Add the following 2 lines:
123.123.123.123 mydomain.com
123.123.123.123 www.mydomain.com
- Replace “mydomain.com” with your domain name
- Replace ‘123.123.123.123’ with the IP address of your LCN hosting. If you are not sure of the correct IP please contact us.
- Save by pressing Control+o then pressing enter on the filename prompt
- Press Control-x to exit nano
- To have your host file changes to take immediate effect paste the following line into Terminal and press enter: dscacheutil –flushcache
- Open your web browser and browser to the domain name above and it’ll resolve to the IP you’ve entered
That’s it! You’ve successfully edited your hosts file.
Undoing the change
When you have completed your checks you will want to undo the change you have made to avoid encountering problems in the future.
To undo the change you will simply need to repeat the above steps from 1 to 5. Rather than add lines you now remove the lines you have added and resave the file.
That’s it your have successfully reverted the change to your hosts file.