How to add a domain on Cloud hosting using cPanel
This guide will explain how to create domain accounts within the WHM control panel and how to access them using cPanel.
-
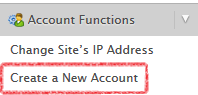
- To add a domain account to cPanel, you will first need to log in to the WHM control panel.
- Select ‘Create a New Account’, under the menu for ‘Account functions’.
- You will then need to enter the following details to add a domain account to the server:
Domain:
Username:
Password:
Email: - Select a package for the domain if you have created a package with customised hosting specifications or tick ‘select options manually’ to customise the hosting specifications. Leaving these options blank will apply unlimited resources by default.
- Select the required options for DNS settings and mail-routing options, then select ‘create’ to add the domain account to the server.
Accessing cPanel for the domain account
You can log in to cPanel for any domain accounts that you have created by going to: http://yourdomain.com:2083 or http://yourdomain/cpanel/
Or by adding – :2083 to the end of your server host-name if the domain has not yet been re-pointed to the server.
You can also select the cPanel icon on the page to ‘list accounts’ under the ‘Account Information’ menu in WHM.